For Hank’s third birthday I made these inexpensive sidewalk chalk party favors.
I bought the pretty striped chalk in packs of four at the drugstore, then rolled each piece in waxed paper and just twisted the ends to seal them. Easy, fast and cheap.
Famous among dozens
For Hank’s third birthday I made these inexpensive sidewalk chalk party favors.
I bought the pretty striped chalk in packs of four at the drugstore, then rolled each piece in waxed paper and just twisted the ends to seal them. Easy, fast and cheap.

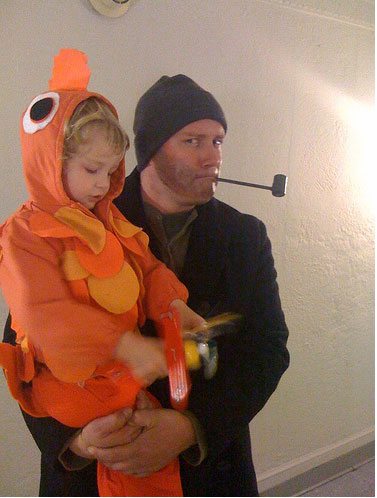
Behold! The cutest little fishy on the face of the planet.

And his little fish bum too! Oh. My. Goodness. The glue-gun burns were a small price to pay.

Bryan was a sea captain.

And I was a jellyfish. I made my hat from a lampshade.

The joy buzzer was the best part of my costume.

The whole costume only cost me like $11. Before going out for the night I added tentacles and a sweater. Surprisingly, there were tons of jellyfish on the street, the best one being a girl who had affixed blacklights to the underside of a white umbrella. I practically genuflected in the street. Happy Halloween!

A birthday cake for Michelle!

Michelle’s artwork was just featured on NPR. She says this is her lucky year, and it’s looking pretty good already.
Remember the pink sweater I started after seeing the project over at Orange Beautiful? It’s finished!
Is this not the grown up version of a tutu? It is quite possibly the pinkest thing I have ever owned. When I wear it, I smell like Bing cherries in a bed of warm cotton candy.

The original J Crew Version was $425, and isn’t available anymore, but I followed the step by step on Orange Beautiful to make this one.

I did things a little differently, because her version required more patience than I could muster, so here’s a run through if you want to make one for yourself. Start with a jacket or slightly boxy sweater, and then embellish it thusly:
1. Buy some fabric. The original rosettes are silk charmeause, but I chose polyester chiffon, because I wanted the flowers to be fluffy instead of cascading. You’ll need about 4 yards of whichever you choose.
2. Cut the fabric in strips and fold it to size. You want your petals to be about 4″ H x 2.5″ W. So I cut my fabric in strips, then folded the strips in half several times until I had a stack of material about the right size. This doesn’t need to be an exact science, but you want something that looks kind of like this:

3. Sew a knot in the middle of the stack to hold the pieces together, and then cut along the folds to create a grouping of square “petals.”

4. Cut the corners off the stack of squares until you have a roughly oval shape:

5. Here’s where it gets a little tedious. Take three layers of fabric at a time, bunch them by hand, and then pass the needle through a few times until you have the ruffles you want. Repeat with the next three layers and so on, until you have a finished rosette:

6. If you don’t like the effect, go back in with your needle and tease apart any layers that are too clumped or whatnot. The back of my rosettes looked like this:

7. When you have about 30 flowers, attach them to your sweater or jacket by hand. I’d wait until you’ve mostly finished the flowers to affix them, because your rosettes will get better as you go along, and you’ll want the prettiest ones up by your face, right? (I didn’t do this, and I wish I had).
8. When all the flowers are affixed, fill in any gaps by sewing down the top and bottom petals of the flowers in areas that need attention.
9. Pull away any stray threads from the flowers’ raw edges.

10. Wear your sweater around the house for a few hours, and pause to trade bon mots with imaginary dignitaries whenever you pass a mirror.
Cute! Now where am I going to wear it? Someone please get married. Thank you.
The Scoop posted a handmade version of the J Crew Astrid jacket a few months back, and when I saw it, little bluebirds flew in the window and landed on my shoulders, and talking mice scurried out of the closet with pins and spools of thread.

Amazing, right? I’ve been working on my own version in bright pink, so it’s extra ka-pow! Here are some of the petals:

It’s almost done, and it’s so good you’ll want to stuff it in your mouth when you see it. Upon seeing it, please restrain yourself, because I’d like to wear it once before I have it dry cleaned.
Making things makes me happy.